
Postings & Profiles
Postings & Profiles
Category: Core Features | Audience: undefined | Page: 15 of 33
Table of Contents
Postings & Profiles
Manage study postings and patient profiles for clinical trial recruitment. Create posting pages with customizable templates, configure site information, and search/filter profiles by project and date range.
Key Concepts
- Posting Page Setup: Create and configure study posting pages with page templates, titles, descriptions, and inclusion/exclusion criteria
- Page Template: Pre-designed layouts for posting pages (e.g., MainContentTemplate.xml)
- Inclusion/Exclusion Criteria: Add links to criteria lists that define study eligibility
- Site Information: Configure site-specific details including name, contact, phone, address, and email using template variables
- Template Variables: Dynamic placeholders (e.g., <%=Site.SiteName%>, <%=StudySite.StudyContactBusinessPhone%>)
- Profiles: Patient profile records searchable by project name and date range
- Profile Search: Filter and locate profiles using project selection and date parameters
What You Can Do
- Create new posting pages with custom templates
- Configure posting page titles and descriptions
- Add inclusion and exclusion criteria links
- Set up site information using template variables
- Search profiles by project name
- Filter profiles by start and end date ranges
- View and manage patient profile data
- Edit profile templates and information
How To
Navigate to Postings
- Log in to the MCT application
- Click on the Projects tab in the main navigation
- Click on the Postings sub-tab to access Posting Page Setup
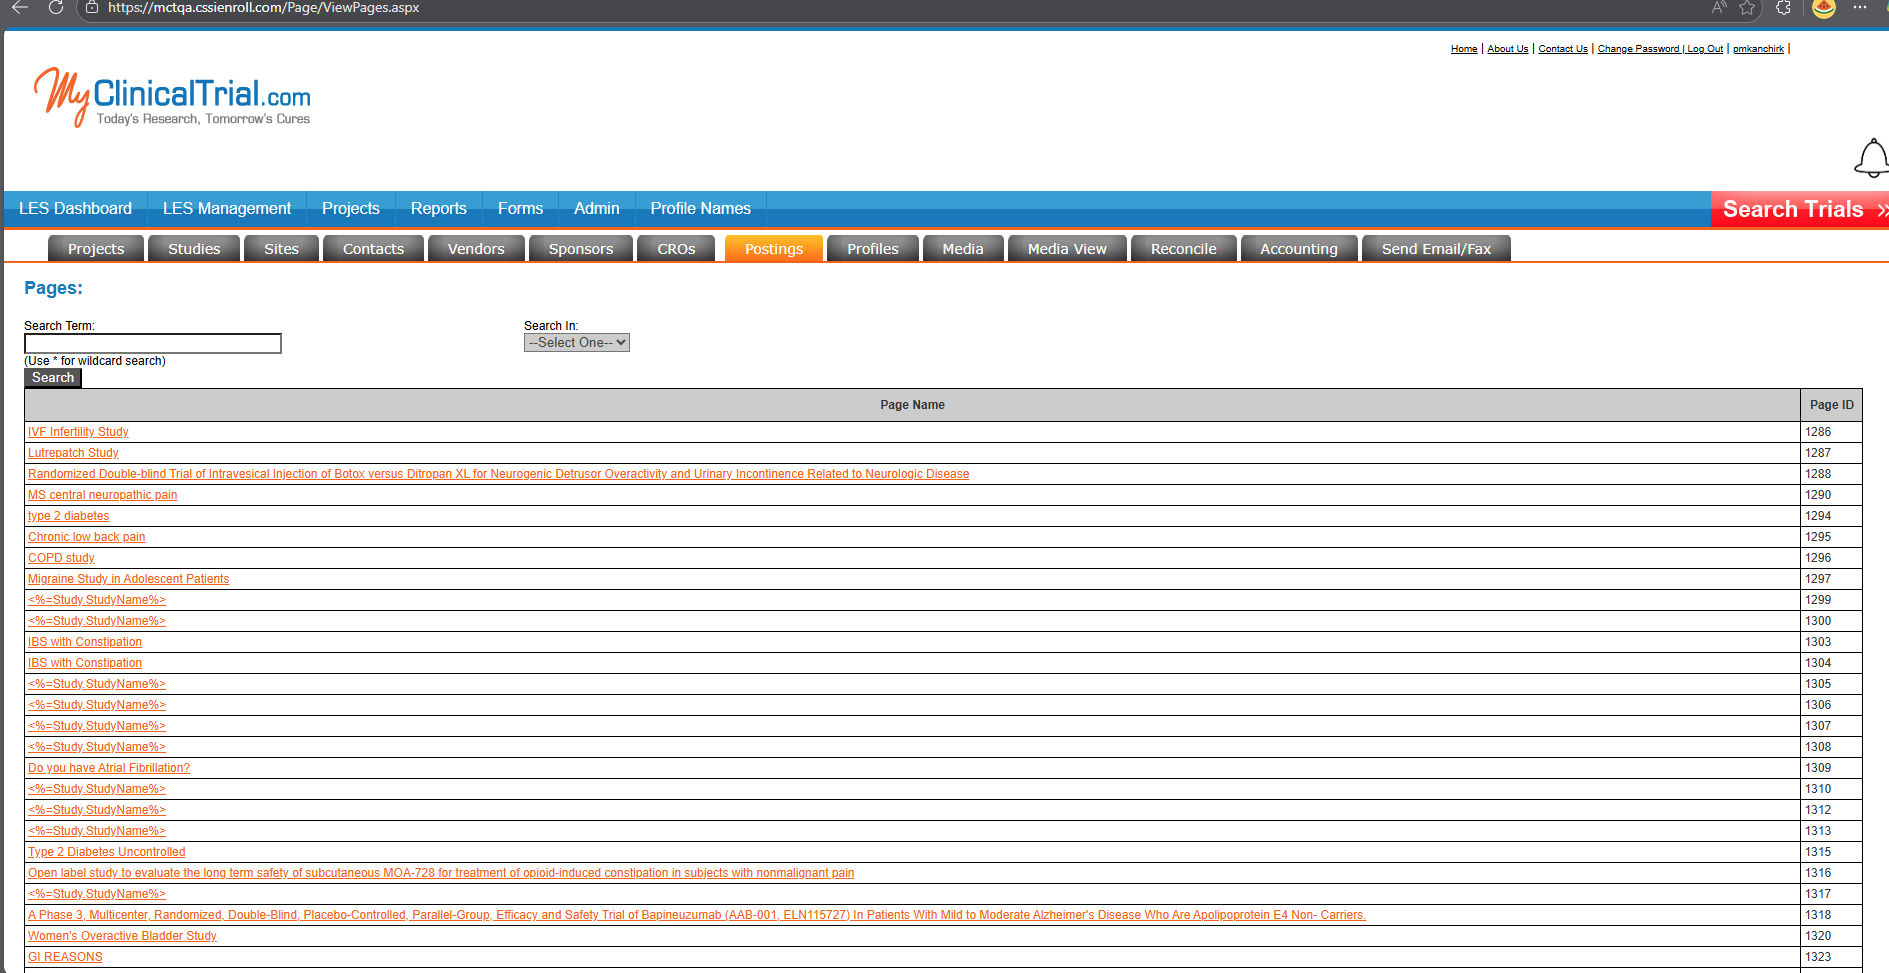
Create or Edit a Posting Page
Posting Page Setup Interface:The Posting Page Setup allows you to configure study posting pages with customizable content.
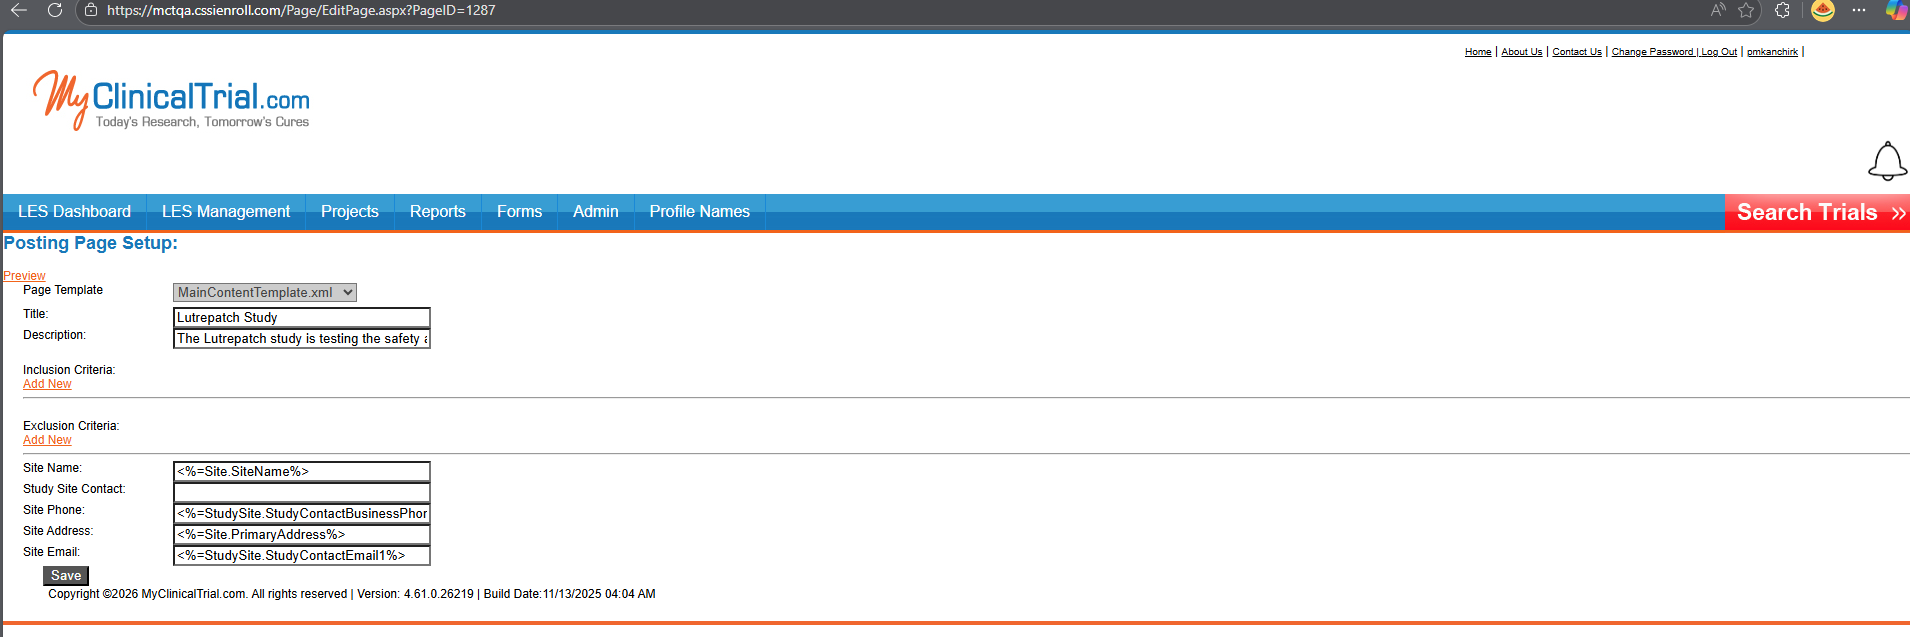 Action Buttons:
- Preview: Preview the posting page before saving
- Save: Save the posting page configuration
- Page Template: Select template from dropdown
- Example: "MainContentTemplate.xml"
- Defines the layout and structure of the posting page
- Title: Enter the posting page title
- Example: "IVF Infertility Study"
- Description: Enter posting description in text area
- Example: "We are currently screening women for Ivo"
- Provides overview of the study
Inclusion Criteria:- Inclusion Criteria: Click Add New link to add inclusion criteria
- Links to criteria that define who can participate
- Displays as list on posting page
Exclusion Criteria:- Exclusion Criteria: Click Add New link to add exclusion criteria
- Links to criteria that define who cannot participate
- Displays as list on posting page
Site Information:Configure site-specific details using template variables:
- Site Name: Enter template variable
- Example: <%=Site.SiteName%>
- Dynamically displays the site name
- Study Site Contact: Enter template variable
- Example: <%=StudySite.StudyContactBusinessPhone%>
- Displays study coordinator or PI contact
- Site Phone: Enter template variable
- Example: <%=Site.PrimaryAddress%>
- Displays site phone number
- Site Address: Enter template variable
- Example: <%=StudySite.StudyContactEmail1%>
- Displays site physical address
- Site Email: Enter template variable
- Example: <%=StudySite.StudyContactEmail1%>
- Displays site contact email
Template Variable Format:- Variables use ASP.NET syntax:
<%=Object.Property%> - Common objects: Site, StudySite
- Common properties: SiteName, StudyContactBusinessPhone, PrimaryAddress, StudyContactEmail1
- Click Preview to see how the page will appear
- Click Save to save the posting configuration
Search and Filter Profiles
Navigate to Profiles:- Log in to the MCT application
- Click on the Projects tab in the main navigation
- Click on the Profiles sub-tab to access Profile Search
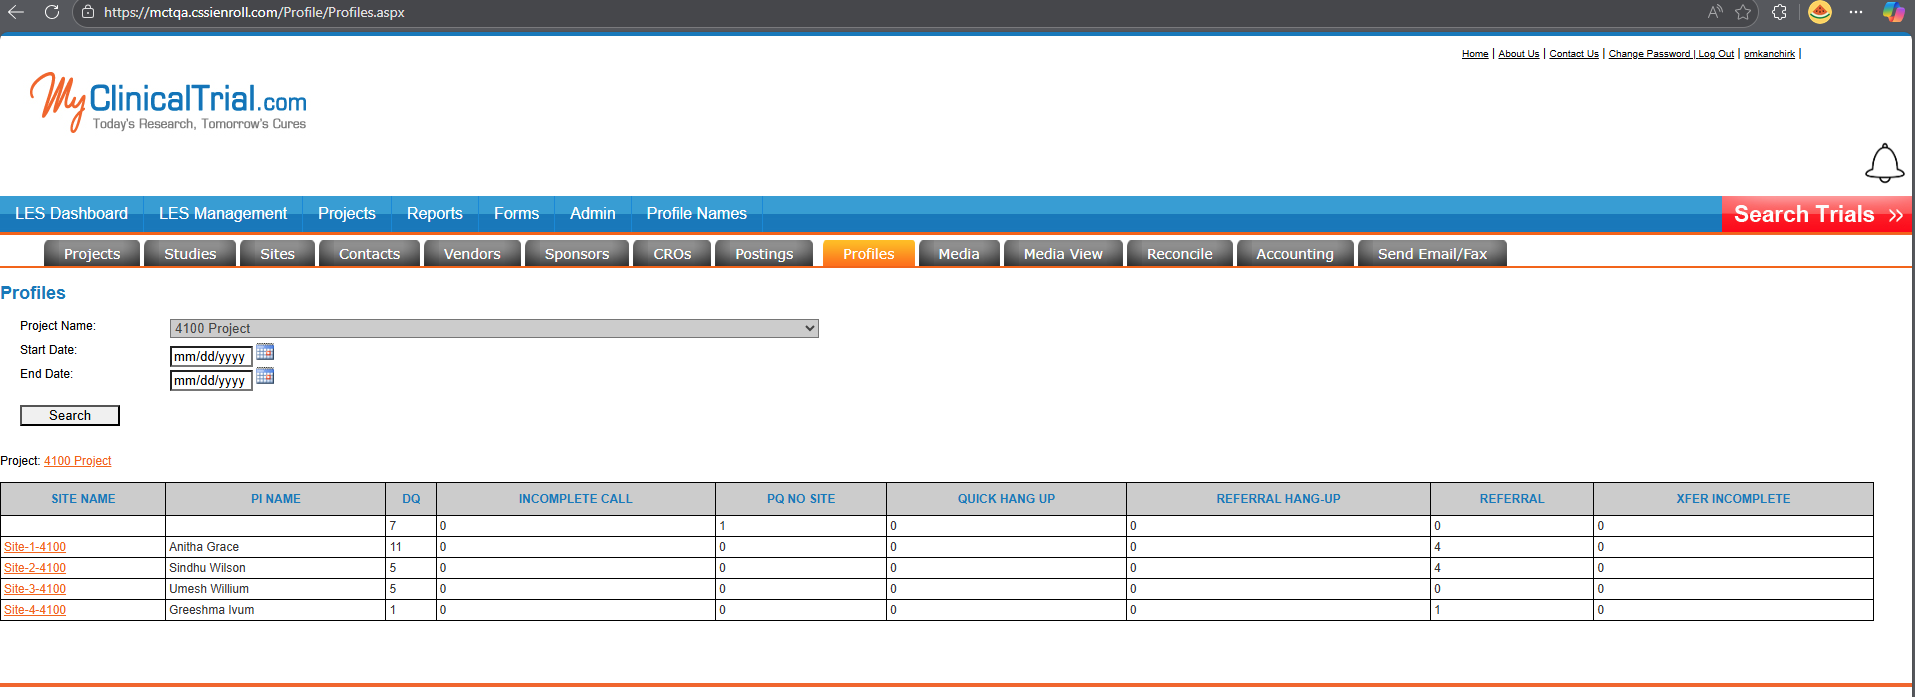 Profile Search Interface:
The Profiles page provides filtering options to locate specific patient profiles and displays summary statistics by site.
Initial Search Filters:- Project Name: Select project from dropdown
- Example: "4100 Project"
- Required field to filter profiles by specific project
- Dropdown lists all available projects
- Start Date: Enter start date in mm/dd/yyyy format
- Calendar icon opens date picker
- Optional field to filter profiles created on or after this date
- Leave blank to search from beginning of time
- End Date: Enter end date in mm/dd/yyyy format
- Calendar icon opens date picker
- Optional field to filter profiles created on or before this date
- Leave blank to search to current date
- Click Search button to load profiles for selected project
- Displays project-level summary table
- Loads profile search and results sections below
Project-Level Summary Table:After selecting a project, the page displays a summary table showing profile statistics by site:
Summary Table Columns:- SITE NAME: Name of the research site (e.g., "Site 1-4100", "Site 2-4100", "Site 3-4100", "Site 4-4100")
- PI NAME: Principal Investigator name (e.g., "Anitha Grace", "Sindhu Wilson", "Umesh William", "Greeshma Ivum")
- DQ: Number of disqualified profiles (e.g., 1, 5, 5, 1)
- INCOMPLETE CALL: Number of incomplete call profiles (e.g., 0)
- PQ NO SITE: Number of pre-qualified with no site assigned (e.g., 1, 0, 0, 0)
- QUICK HANG UP: Number of quick hang-up calls (e.g., 0)
- REFERRAL HANG-UP: Number of referral hang-ups (e.g., 0)
- REFERRAL: Number of referrals (e.g., 0, 4, 4, 0, 1)
- XFER INCOMPLETE: Number of incomplete transfers (e.g., 0)
This summary provides a quick overview of profile status distribution across all sites in the selected project.
Profile Subject Line Section:Below the summary table is the detailed profile search interface:
Search Fields:- Profile Subject Line: Label for the search section
- Search in: Select search field from --Select-- dropdown
- Choose which field to search in
- Options may include profile fields, patient name, etc.
- Search Term: Enter search keywords in text field
- Free text search based on selected search field
- Result: Filter by result type using checkboxes
- ☐ DQ: Disqualified profiles
- ☐ Info Only: Information only calls
- ☐ PQ No Site: Pre-qualified without site assignment
- ☐ Referral: Referral profiles
- Select multiple checkboxes to filter by multiple result types
- Rows per Page: Select number of results per page
- Dropdown with value "10"
- Control pagination display
- Click Search button to execute the search with selected filters
After searching, the system displays a detailed profiles table:
Table Header Actions:- Select All: Checkbox to select all profiles on current page
- Links for bulk actions: Profile, Edit Profile, Show PDF
- Checkbox: Select individual profiles for bulk actions
- Profile: Orange link to view full profile details
- Edit Profile: Orange link to edit profile information
- Show PDF: Orange link to view/download profile as PDF
- Checkbox: Additional selection checkbox
- PI NAME: Principal Investigator name (e.g., "Anitha Grace")
- ORIGINATION: Source of profile (e.g., "WEB" for web form submissions)
- SITENAME: Assigned site name (e.g., "Site 1-4100") shown as orange link
- DATE CREATED: Timestamp when profile was created
- Format: M/D/YYYY H:MM:SS AM/PM
- Examples: "9/26/2022 8:53:45 AM", "9/23/2022 8:03:51 AM", "9/23/2022 5:16:53 AM"
- DATE SENT: When profile was sent to site (may be empty)
- PATIENT NAME: Patient's name (e.g., "test test")
- RESULT: Profile result status
- "DQ" (Disqualified)
- "Referral"
- "No Status"
- STATUS: Current profile status
- "No Status"
- "Not interested"
- Other status values
- PROFILE ID: Unique profile identifier (e.g., 169220, 169219, 169203, 169201, 169200, 169199, 169198, 169197, 169196, 169195)
The table shows multiple profiles with details:
- Profile ID 169220: Anitha Grace, WEB, Site 1-4100, 9/26/2022 8:53:45 AM, DQ, No Status
- Profile ID 169219: Anitha Grace, WEB, Site 1-4100, 9/26/2022 8:52:05 AM, test test, Referral, Not interested
- Profile ID 169203: Anitha Grace, WEB, Site 1-4100, 9/23/2022 8:03:51 AM, DQ, No Status
- Multiple additional entries following similar pattern
- Click Profile link to view complete profile details
- Click Edit Profile link to modify profile information
- Click Show PDF link to generate/view PDF version
- Click SITENAME link to view/edit site details
- Use checkboxes to select profiles for bulk operations
- Project Name and date range filters are at the top of the page
- Leave dates blank to search all time periods
- Use Start Date only to find profiles after a specific date
- Use End Date only to find profiles before a specific date
- Use both dates to find profiles within a specific range
- Check DQ to show only disqualified profiles
- Check Info Only for information-only calls
- Check PQ No Site for pre-qualified profiles without site assignment
- Check Referral to show only referral profiles
- Multiple checkboxes can be selected simultaneously
- Sortable columns (click column headers)
- Orange links for Profile, Edit Profile, Show PDF, and SITENAME
- Select All checkbox for bulk operations
- Pagination controls at bottom of table
- Rows per Page dropdown to control display density
Tips & Best Practices
- Page Templates: Select appropriate templates based on your posting needs - MainContentTemplate.xml provides a standard layout
- Template Variables: Use consistent template variable syntax
<%=Object.Property%>to pull data from the database - Site Information Variables: Common variables include:
- <%=Site.SiteName%> for site name
- <%=StudySite.StudyContactBusinessPhone%> for contact phone
- <%=Site.PrimaryAddress%> for address
- <%=StudySite.StudyContactEmail1%> for email
- Inclusion/Exclusion Criteria: Use "Add New" links to build comprehensive criteria lists that help patients self-screen
- Preview Before Saving: Always preview posting pages to verify template variables render correctly
- Title and Description: Write clear, concise titles and descriptions that accurately represent the study
- Profile Search: Use date ranges to narrow down profile searches when looking for specific time periods
- Project Selection: Select specific projects to filter profiles rather than searching all projects at once
- Date Format: Always use mm/dd/yyyy format for date fields to ensure consistent search results
- Keep Postings Current: Regularly update posting pages to reflect current study status and site availability
- Variable Testing: Test template variables across different sites to ensure data displays correctly
Next Steps
- Create a test posting page using the Page Template dropdown
- Configure Title and Description for your study
- Add Inclusion and Exclusion criteria using "Add New" links
- Set up Site Information fields with appropriate template variables
- Preview the posting page to verify all variables render correctly
- Save the posting configuration
- Use Profile Search to locate profiles by project and date range
- Filter profiles using Start Date and End Date fields for specific time periods
- Review the profile results table for detailed patient information
- Edit existing postings to update information as studies progress
Navigation
← Previous: Custom Screener
📚 Documentation HomeNext: Reports & Analytics →
Generated from MCT Knowledge Base • v1.1.0 • January 2, 2026