
Studies Management
Studies Management
Category: Core Features | Audience: undefined | Page: 9 of 33
Table of Contents
- Create and Configure New Studies
- Edit Studies and Link Them to Projects
- Track Study Progress, Phases, and Status
Studies Management
Welcome to the Studies Management section of Elixia Health's clinical trial platform. This guide will help you navigate and manage clinical trial studies within MCT. Studies are accessed through the Projects section and contain detailed information about the trial, including therapeutic areas, medical conditions, inclusion/exclusion criteria, and postings.
Key Concepts
- Studies Tab: Accessed via Projects > Studies in the secondary navigation
- Study Details Page: Comprehensive form for managing study information including dates, protocol ID, description, and therapeutic areas
- Therapeutic Area: Medical specialty categories (e.g., Cardiology/Vascular Diseases, Dermatology, Endocrinology)
- Medical Conditions: Specific diseases or conditions being studied (e.g., Diabetes, Abdominal Cancer, Acne)
- Inclusion/Exclusion Criteria: Rules defining who can/cannot participate in the study
- Postings: Study recruitment postings with associated pages and screeners
- Participating Sites: Clinical sites involved in the study with posting dates
What You Can Do
- View and edit study details (name, dates, protocol ID, description)
- Configure therapeutic areas and medical conditions for the study
- Manage inclusion and exclusion criteria
- Create and manage study postings and screeners
- Set up participating sites with posting dates
- Upload files related to inclusion/exclusion criteria
How To
Access the Studies Section
- Log in to MCT
- Click on the Projects tab in the main navigation
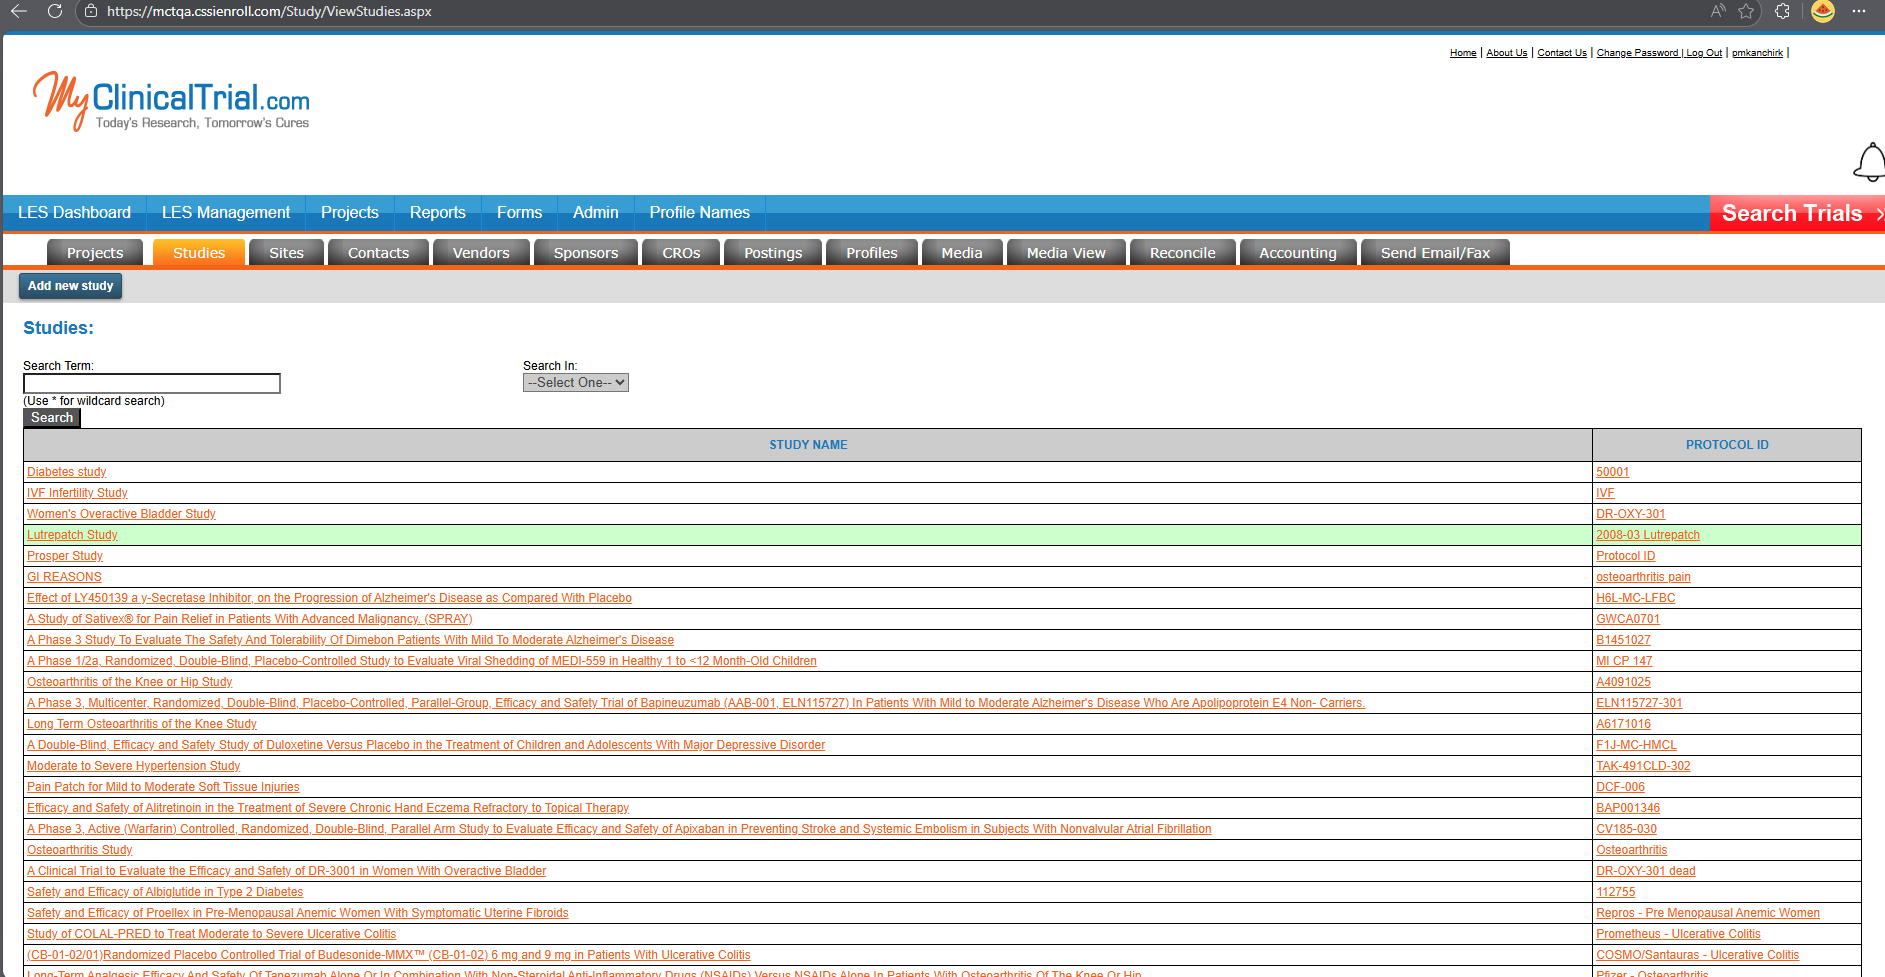
- Click on the Studies sub-tab in the secondary navigation
- Select a study from the list to view/edit its details
View and Edit Study Basic Information
The study details page contains the following key fields:
Basic Information:- Study Name: The name of the clinical trial (e.g., "Diabetes study")
- Start Date: Study start date with date/time picker (format: MM/DD/YYYY HH:MM:SS AM/PM)
- End Date: Study end date with date/time picker
- Protocol ID: Study protocol identifier (e.g., "50001")
- Note: Display shows "(Comma separated list)" for multiple protocol IDs
- Description: Text area for detailed study description (e.g., "This is a Diabetes Study")
- Study Website: URL for the study website
- Keywords: Study-related keywords for search and categorization
- Phone Screener Number: Contact number for phone screening
- Click in any field to modify the value
- Use the date picker icons (calendar) for date fields
- Click the Save button at the top of the page to save changes
Configure Therapeutic Areas
Therapeutic areas define the medical specialty of the study:
- View Available Areas: The left list shows all available therapeutic areas:
- Cardiology/Vascular Diseases
- Dental and Oral Health
- Endocrinology
- Gastro
- Gastroenterology
- General Practice (Family Med.)
- And more...
- Select Therapeutic Area: The right panel shows "Study Therapeutic Area" (e.g., Dermatology)
- Transfer Between Lists:
- Use the >> button to move items from available areas to study areas
- Use the << button to remove items from study areas
Configure Medical Conditions
Medical conditions specify what diseases/conditions the study focuses on:
- View Available Conditions: The left list shows "Medical Conditions" including:
- A Test
- Abdominal Cancer
- Achalasia
- Acid Maltase Deficiency
- Acne
- Acquired Immune Deficiency
- And more...
- Select Study Conditions: The right panel shows "Study Medical Conditions"
- Transfer Conditions:
- Use the >> button to add conditions to the study
- Use the << button to remove conditions from the study
- Select multiple conditions by holding Ctrl while clicking
Manage Inclusion/Exclusion Criteria
This section defines who can or cannot participate in the study. Use inclusion criteria to specify who qualifies for the study, and exclusion criteria to specify who should not participate.
Add New Criteria:- Criteria Type: Select from dropdown (Inclusion or Exclusion)
- Criteria: Enter the criteria text in the large text area
- Supports multi-line text for detailed criteria descriptions
- Order Number: Enter a numeric value to control the display order of criteria
- Click the Add button to add the criteria to the study
- Click the Save button to save all criteria changes
The criteria table displays all inclusion and exclusion criteria for the study with the following columns:
- CRITERIAID: Unique identifier for each criterion
- CONTENT: The full text of the criteria (e.g., "exclusion 1", "Inclusion 1")
- CRITERIATYPE: Type designation (Inclusion or Exclusion)
- CRITERIATYPEID: Numeric type identifier
- ENTITYID: Reference to the parent entity (e.g., 3)
- ENTITYTYPE: Entity type (Study)
- ORDERNUMBER: Display order number
- CREATEDBY, CREATEDDATE, MODIFIEDBY, MODIFIEDDATE: Audit trail fields
- Click on criteria entries (shown as orange links) to edit existing criteria
- Modify the Criteria Type, Criteria text, or Order Number as needed
- Click Save to commit changes
Manage Study Postings
Postings are recruitment pages for the study:
Posting Actions:- Delete Posting: Remove a posting (shown as orange link)
- Edit Posting: Modify posting details (shown as orange link)
- Show Posting: Preview the posting (shown as orange link)
- Create Screener: Create a new screening page (shown as orange link, labeled "New Screener")
The postings table shows:
- Page ID: Unique page identifier (e.g., 1706)
- Page Type: Type of page (e.g., Posting)
- Page Name: Name of the posting page (e.g., "Diabetes study")
Configure Participating Sites
Set up clinical sites that will participate in the study. This section allows you to manage which clinical sites can recruit patients for the study and control posting visibility.
Set Global Posting Dates:- MCT Posting Start Date: When postings become active globally (format: MM/DD/YYYY HH:MM:SS AM/PM)
- Example: 10/31/2008 12:00:00 AM
- MCT Posting End Date: When postings expire globally
- Example: 5/16/2009 12:00:00 AM
Manage Sites:- Activate all Postings: Click this button to activate postings for all participating sites at once
- Search: Search for existing sites to add to the study
- Upload Sites: Bulk upload sites from a file
- Posting Active Checkbox: Enable/disable posting functionality globally
The sites table displays detailed information for each participating site:
| Column | Description | Example |
|--------|-------------|---------|
| Select | Checkbox to select sites for bulk actions | ☑ |
| Delete | Remove site from study (orange link) | Delete |
| SITENAME | Name of the clinical site (clickable link) | Medex Healthcare Research Chicago |
| SITEID | Unique site identifier | 1165 |
| STUDYCONTACTNAME | Study coordinator at the site | Study Coordinator |
| STUDYCONTACTPHONE | Contact phone number | 312-348-7248 x 707 |
| URL | Site website URL | www.medexhealth.net |
| SITEPRIMARYADDRESS | Physical address of the site | 9700 N. Kenton Ave #405 Chicago IL USA 60603 |
| STUDYSITEID | Study-specific site ID | 2286 |
| POSTINGACTIVE | Checkbox to enable/disable posting for this site | ☑ |
| POSTINGSTART | Site-specific posting start date/time | 1/1/2010 12:00:00 AM |
| POSTINGEND | Site-specific posting end date/time | 12/1/2010 12:00:00 AM |
| POSTINGLINK | Links to manage site-specific postings | view posting \| Create Custom |
Working with Participating Sites:- Add Sites: Click Search to find and add existing sites, or Upload Sites to bulk import
- Edit Site Details: Click on the site name (orange hyperlink) to view/edit site information
- Set Site-Specific Dates: Each site can have its own posting start and end dates
- Control Site Visibility: Uncheck POSTINGACTIVE for a site to temporarily hide its posting
- Manage Posting Links:
- Click view posting to preview the live recruitment page for that site
- Click Create Custom to create custom posting variations for the site
- Remove Sites: Click Delete to remove a site from the study
- Navigate Pages: Use the page numbers (1 2 3 4 5 6 7 8 9) at the bottom to view additional sites
Manage Tracking
The Tracking section allows you to add date-based tracking information for the study:
Available Fields:- Description: Text field to describe what is being tracked
- Start Date: Beginning date for the tracked item (format: mm/dd/yyyy with date picker)
- End Date: Ending date for the tracked item (format: mm/dd/yyyy with date picker)
- Click the Add button in the Tracking section
- Enter a description in the Description field
- Select the Start Date using the date picker or type in mm/dd/yyyy format
- Select the End Date using the date picker or type in mm/dd/yyyy format
- Click the Save button to save the tracking entry
Use this section to track important study milestones, enrollment periods, or other time-based metrics.
Configure Custom Fields
Custom fields allow you to extend the study data model with additional information specific to your needs:
Available Fields:- Element: Name or identifier for the custom field element (text input)
- Value 1: First value field for custom data (text input)
- Value 2: Second value field for custom data (text input)
- Field Dropdown: Selector showing available fields (e.g., "Field1")
- Click the Add button in the Custom Fields section
- Enter the Element name to identify the custom field
- Enter Value 1 with the first piece of custom data
- Enter Value 2 with the second piece of custom data (if needed)
- Use the dropdown to select or configure field types
- Click the Save button to save the custom field configuration
Custom fields are useful for capturing study-specific data that isn't covered by standard fields, such as internal tracking codes, sponsor-specific identifiers, or custom classification values.
Add Study Notes
Use the Notes section to document important information, observations, or context about the study:
To add notes:- Navigate to the Notes section at the bottom of the page
- Enter any relevant notes, observations, or documentation in the text area
- Notes can include decisions made, protocol deviations, communications with sponsors, or any other important context
- Notes provide an audit trail and help team members understand the study's history and current status
Save Your Changes
Always save your work:- After making any changes to study details, therapeutic areas, medical conditions, or other settings
- Click the blue Save button at the top left of the page
- The system will save all modifications to the study record
Tips & Best Practices
Next Steps
Now that you understand Studies Management:
- Explore Sites Management to learn how to manage participating clinical sites
- Review Postings to understand how recruitment pages are created and managed
- Check out Contacts to manage study coordinators and principal investigators
- Learn about Profiles to understand how study profiles are configured
For questions about study setup or configuration, contact your project manager or system administrator.
Navigation
← Previous: Projects Management
📚 Documentation HomeNext: Sites Management →
Generated from MCT Knowledge Base • v1.1.0 • January 2, 2026