
Dashboard Overview
Dashboard Overview
Category: Core Features | Audience: undefined | Page: 7 of 33
Table of Contents
Dashboard Overview
Welcome to the MCT interface, your central hub for managing Elixia Health clinical trial data. MCT uses a tab-based navigation system that provides access to different functional areas based on your user role.
Key Concepts
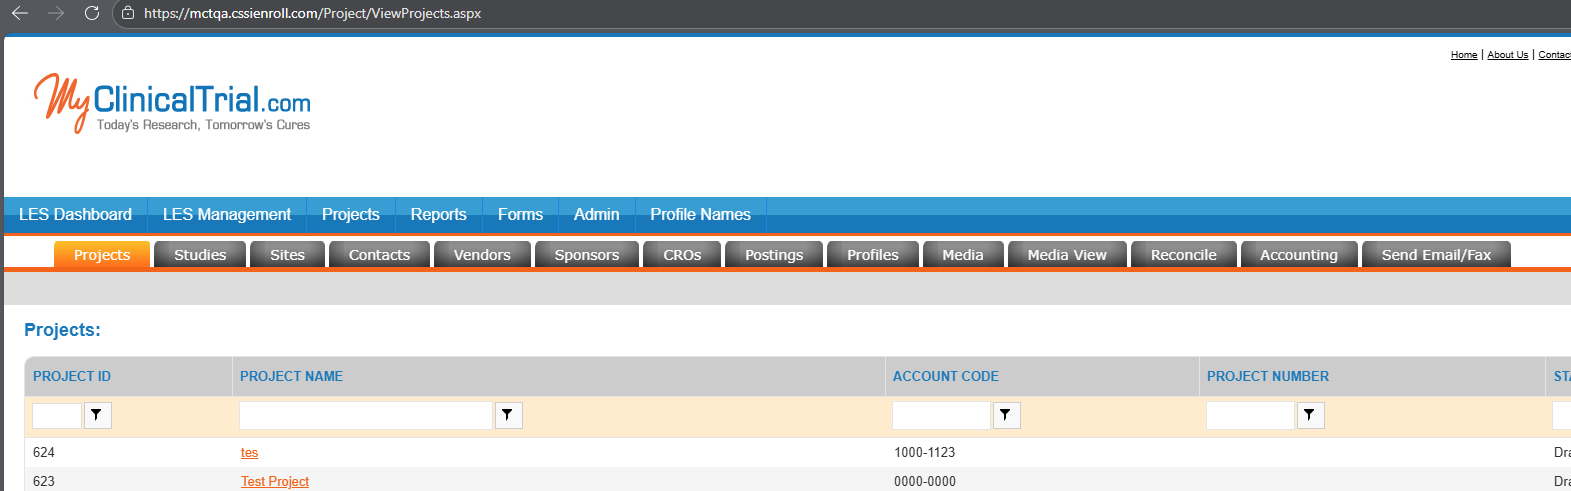
MCT organizes information using a two-level tab navigation system:
- Primary Navigation Tabs: Main functional areas displayed at the top of the screen
- Secondary Navigation Tabs: Sub-sections within each main area (e.g., Projects has sub-tabs like Studies, Sites, Contacts, etc.)
Access to tabs depends on your assigned user role. Each tab displays data in organized tables with filtering and sorting capabilities.
What You Can Do
- Navigate between different functional areas using the main navigation tabs
- Access detailed sub-sections within each area using secondary tabs
- View and manage data in organized tables
- Filter and sort records using column filters
- Search for specific trials or records using the search functionality
How To
Access the Main Dashboard Areas
- Log in to MCT at the MCT portal
- After login, you'll see the main navigation bar with tabs based on your role:
- LES Dashboard: Local Enrollment System overview
- LES Management: Enrollment management tools
- Projects: Clinical trial projects and related data
- Reports: Reporting and analytics
- Forms: Access to system forms
- Admin: Administrative functions
- Profile Names: User profile management

Navigate the Projects Section
The Projects tab contains multiple sub-tabs for different data categories:
- Click on Projects in the main navigation
- Use the secondary navigation to access:
- Projects: View all clinical trial projects
- Studies: Manage study information
- Sites: Clinical site management
- Contacts: Contact information
- Vendors: Vendor management
- Sponsors: Sponsor information
- CROs: Contract Research Organizations
- Postings: Job/study postings
- Profiles: Profile management
- Media: Media content management
- Media View: View media files
- Reconcile: Reconciliation tools
- Accounting: Financial tracking
- Send Email/Fax: Communication tools
Work with Data Tables
Each section displays data in organized tables:
- View Records: Tables show columns like Project ID, Project Name, Account Code, Project Number, Status
- Filter Data: Use the filter icons (▼) at the top of each column to filter results
- Sort Records: Click column headers to sort data
- Access Details: Click on record names (displayed as links) to view/edit details
Tips & Best Practices
Next Steps
Explore the different navigation tabs to familiarize yourself with the available features. Start with the Projects section to understand the two-level navigation system. Use the table filters to practice finding specific records quickly. If you have any questions or need further assistance, reach out to your system administrator.
Navigation
← Previous: Login & Authentication
📚 Documentation HomeNext: Projects Management →
Generated from MCT Knowledge Base • v1.1.0 • January 2, 2026