
Forms & Form Builder
Forms & Form Builder
Category: Forms & Surveys | Audience: undefined | Page: 13 of 33
Table of Contents
- Upload Forms from Local Device
- Edit Forms and Create Custom Form Fields
Forms & Form Builder
Manage screening forms and surveys for clinical trials using the Screener Builder. Create forms with custom sections, questions, and validation logic. The form builder provides four main tabs: Forms, Sections, Questions, and Response Groups for complete form management.
Key Concepts
- Screener Builder: Comprehensive tool for creating and managing screening forms with multiple configuration tabs
- Forms Tab: Define form properties including name, type, language, dates, and external integrations
- Sections Tab: Organize forms into sections with headers, footers, and validation text
- Questions Tab: Create and manage individual questions with variables, question types, and conditional logic
- Response Groups: Define answer options and response groups for questions
- Form Identifier: Unique identifier for distinguishing different form types
- Java Scripts: Custom JavaScript code for form behavior and validation
- Section JSON: JSON configuration for advanced section customization
- Question Variables: Database field names for storing question responses
- QuestionInfo: Conditional logic and branching rules for questions
What You Can Do
- Create and edit screening forms with complete configuration
- Organize forms into logical sections with custom styling
- Define question types (text, radiolist, textarea, hidden, etc.)
- Set up conditional logic and question branching
- Configure form validation rules
- Add custom JavaScript for form behavior
- Upload external CSS for form styling
- Set form publication dates and versioning
- Manage question ordering and dependencies
- Configure stored procedures for data processing
How To
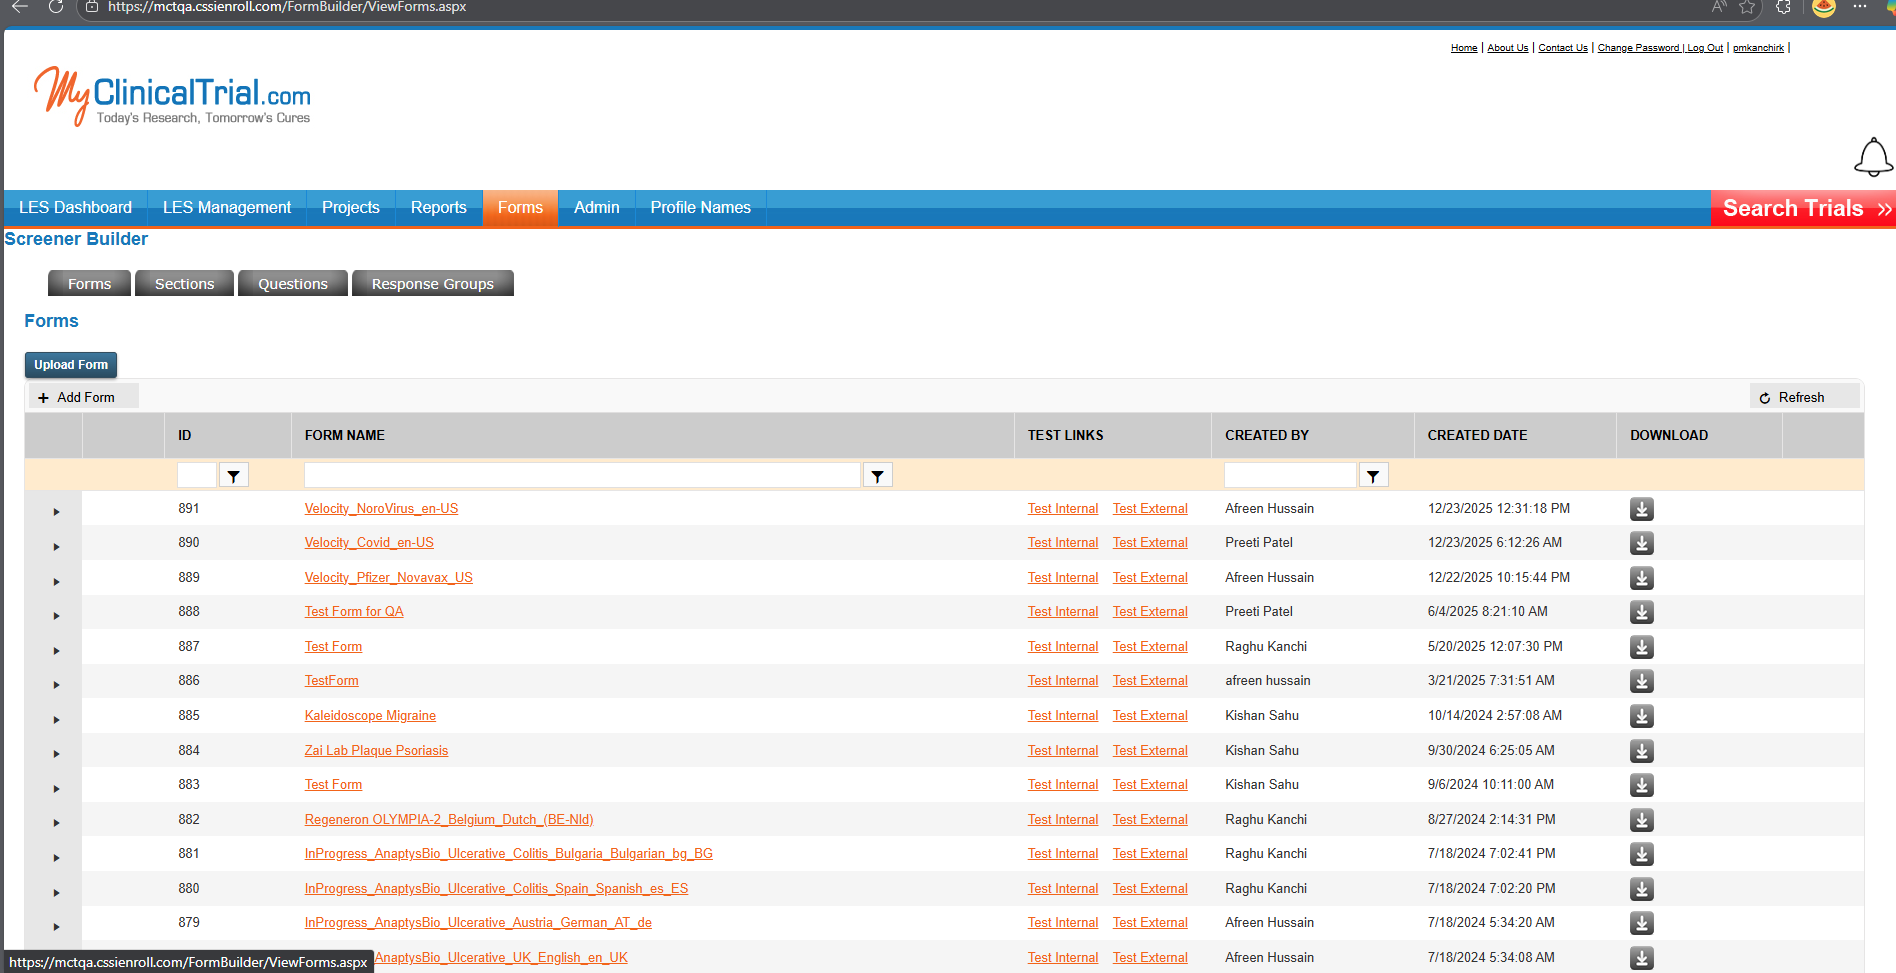
Access the Screener Builder
- Log in to the MCT application
- Click on the Forms tab in the main navigation
- The Screener Builder interface will open with four tabs: Forms, Sections, Questions, Response Groups
Create or Edit a Form
Navigate to Forms Tab:The Forms tab provides complete form configuration with Cancel, Save, and Add buttons at the top.
Form Configuration Fields:- Form Name: Enter the form name (text input)
- Short Desc: Enter a brief description in the large text area
- Form Type: Select form type from --Select One-- dropdown
- Form Identifier: Select identifier from --Select One-- dropdown
- Language Code: Select language (dropdown shows "en-US")
- Active Date: Enter date when form becomes active (text input)
- Expiration Date: Enter date when form expires (text input)
- Version: Enter form version number (text input)
- Published: Enter publication status (text input)
- External Css Link: Upload CSS file using Choose File button (shows "No file chosen")
- External Submit Destination: Upload destination file using Choose File button (shows "No file chosen")
- Java Scripts: Large text area for adding custom JavaScript code
- Java Script Name: Enter script name (text input)
- Magic Number: Enter magic numbers separated by ',' (text input with helper text)
- Short Code: Enter short code (text input)
- Profile Target Email: Enter target email for profile notifications (text input)
- Click Cancel to discard changes
- Click Save to save form configuration
- Click Add to add new form
Configure Form Sections
Navigate to Sections Tab:Access: Forms -> Edit -> Sections -> Edit -> General Information
The breadcrumb shows: Ferring BPH -> Sections -> Edit -> General Information
Section Configuration: Action Buttons: Save, New, Next (top of page)- Section Name: Enter section name (e.g., "General Information")
- Section Text: Enter section description in large text area
- Validator Text: Enter validation text in large text area (e.g., "Test")
- Order Number: Enter numeric order (e.g., "1")
- Section Type: Select from dropdown (shows "Question Section")
- Section Kind: Select from dropdown (shows "--Select--")
- Header: Enter section header HTML in large text area
- Footer: Enter section footer HTML in large text area
- Section JSON: Enter JSON configuration in large text area
- Click Save to save section configuration
- Click New to create a new section
- Click Next to proceed to next section
The Sections area also displays a table showing all sections in the form:
Action Buttons: Save Order, Add, Import (for managing sections) Sections Table Columns:- Section Name: Name of the section (orange link to edit)
- General Section
- DQ Section
- DQ No site
- DQ Section
- Hidden Form Adapter
- Hidden Form Adapter Call Info
- SectionText: Description or content of the section
- "Velocity - Novo"
- "You are required to answer this question"
- "You are required to answer the question above."
- "You are required to answer the question"
- Validator Text: Validation message text
- "You are required to answer this question"
- "You are required to answer this question"
- "You are required to answer the question above."
- "You are required to answer the question"
- SectionID: Unique section identifier (3926, 3927, 3928, 3929, 3930, 3931)
- Order: Display sequence (1, 2, 3, 4, 6, 7)
- Created Date: Timestamp (MM/DD/YYYY HH:MM:SS AM format)
- All showing: "12/23/2025 12:00:00 AM"
- Created By: User who created the section (54, 66, 264)
- Question Count: Number of questions in section (8, 14, 10, 10, 22, 3)
- SectionReferenceID: Reference identifier (3944, 3945, 3946, 3941, 3942, 3943)
- Delete: Orange "Delete" link for each section
Below the main form fields, there's a Result Messages/Recordings configuration area:
Action Buttons: Save, Clear- Result: Select result type from --Select-- dropdown
- Message Content: Enter message text in text area
- Upload Recording: Upload audio file using Choose File button (shows "No file chosen")
This section allows you to configure messages and recordings that play based on form results.
Manage Questions
Questions Table:The Questions section displays all form questions with the following structure:
Action Buttons: Save Order, Add (top of questions table) Questions Table Columns:- (Edit Link): Orange "Edit" link for each question
- Question Text: Full text of the question
- "How did you hear about the research study?"
- "What is your first name?"
- "What is your last name?"
- "What is your address?"
- "What is your day time phone number?"
- "What is your evening phone number?"
- "What is your email address?"
- "What is your gender?"
- "Test"
- Variable: Database field name (e.g., "HowDidYouHear", "fname", "lname", "Address", "PhoneNumber", "EveningPhone", "EmailAddress", "Gender")
- QuestionID: Question identifier (101, 102, 103, 108, 104, 105, 106, 107, 8393)
- Order: Display order (1-10)
- Created Date: Timestamp (MM/DD/YYYY HH:MM:SS AM format)
- Examples: "10/22/2009 12:00:00 AM", "3/21/2014 11:16:09 AM", "3/11/2010 12:00:00 AM"
- StoredProcedure: Stored procedure reference (mostly empty)
- Question Type: Type of question (radiolist, text, textarea, hidden)
- QuestionReferenceID: Reference ID (105, 107, 112, 108, 109, 110, 111, 8472, 852-860)
- SectionReferenceID: Section reference (shows "22" or "87")
- (Delete Link): Orange "Delete" link for each question
Forms often include hidden fields for tracking and data collection:
- FormReferenceID (QuestionID: 817, Order: 1)
- ProjectID (QuestionID: 818, Order: 2)
- StudyID (QuestionID: 819, Order: 3)
- Origination (QuestionID: 820, Order: 4)
- Result (QuestionID: 821, Order: 5)
- CallerID (QuestionID: 822, Order: 6)
- xferphone (QuestionID: 823, Order: 7)
- call_duration (QuestionID: 824, Order: 8)
- ProjNbr (QuestionID: 825, Order: 9)
These hidden fields (Question Type: "hidden") store metadata and tracking information without displaying to users.
Configure Question Information
QuestionInfo Table:Below the Questions table is the QuestionInfo section showing conditional logic:
Action Buttons: Edit (for each row) QuestionInfo Table Columns:- (Edit Link): Orange "Edit" link
- Variable: Database field name (e.g., "HowDidYouHear", "fname", "lname", "Result")
- Category: Category type (e.g., "DQ", "TotalCalls", "Screened", "PreQualified", "Referred")
- Operator: Comparison operator (e.g., "In")
- SetValue: Value to set (empty in most cases)
- CompareValue: Value to compare or condition text
- Examples: "Referral, Xfer Incomplete, Referral Hang-up, PQ NI, PQ No Site, DQ, Incomplete Call, Info Only, 0 Xf"
- "Referral, Xfer Incomplete, Referral Hang-up, PQ NI, PQ No Site, DQ"
- "Referral, Xfer Incomplete, Referral Hang-up, PQ NI, PQ No Site"
- QuestionReferenceID: Question reference (105, 106, 107, 856)
- SectionReferenceID: Section reference (shows "22" or "87")
- QuestionInfoID: Unique info identifier (3352, 3353, 3354, 18-21)
The QuestionInfo table shows conditional logic for the "Result" variable:
- TotalCalls In: Result = "Referral, Xfer Incomplete, Referral Hang-up, PQ NI, PQ No Site, DQ, Incomplete Call, Info Only, 0 Xf" (QuestionInfoID: 18)
- Screened In: Result = "Referral, Xfer Incomplete, Referral Hang-up, PQ NI, PQ No Site, DQ" (QuestionInfoID: 19)
- PreQualified In: Result = "Referral, Xfer Incomplete, Referral Hang-up, PQ NI, PQ No Site" (QuestionInfoID: 20)
- Referred In: Result = "Referral, Xfer Incomplete, Referral Hang-up" (QuestionInfoID: 21)
These rules define cascading conditions for categorizing patient responses and call outcomes.
Question Type Options:- radiolist: Radio button selection
- text: Single-line text input
- textarea: Multi-line text area
- hidden: Hidden field for data storage
Manage Response Groups
Navigate to Response Groups Tab:The Response Groups tab displays all available answer option groups that can be assigned to questions.
Action Button: Add (to create new response groups) Response Groups Table:The table shows all response groups with filtering and pagination:
Table Columns:- EDIT: Orange link to edit the response group
- GROUP NAME: Name of the response group
- YesNo
- know
- YesDontKnow
- Gender
- NextPrevious
- NewOld1
- Medical Conditions
- Storage Conditions
- Le
- IRB Type
- RESPONSE GROUP ID: Unique identifier (1-10 shown)
- Shows "Page 1 of 93, Items 1 to 10 of 925"
- Navigation: 1 2 3 4 5 6 7 8 9 10 ... (page numbers)
Each column header has a dropdown filter (▼) for searching/filtering response groups.
Using Response Groups:Response groups define the answer options for radiolist questions. For example:
- YesNo group: Yes/No options for binary questions
- Gender group: Gender selection options
- YesDontKnow group: Yes/Don't Know/No options
- Medical Conditions group: List of medical conditions for selection
To assign a response group to a question, edit the question and select the appropriate group based on the answer options needed.
Tips & Best Practices
- Form Organization: Use clear, descriptive form names and organize forms by study or purpose
- Section Ordering: Use the Order Number field in sections to control display sequence
- Question Variables: Choose meaningful variable names that match database schema conventions (e.g., FormReferenceID, ProjectID, StudyID)
- Question Types: Select appropriate question types:
- radiolist: For multiple choice with response groups
- text: For short answers (names, phone numbers)
- textarea: For long responses (addresses, descriptions)
- hidden: For tracking data (IDs, timestamps, metadata)
- Hidden Fields: Use hidden fields to capture metadata like FormReferenceID, ProjectID, StudyID, Origination, Result, CallerID, xferphone, call_duration, ProjNbr
- Validation Text: Use Validator Text in sections to provide helpful error messages
- JavaScript Validation: Add custom JavaScript for client-side validation and dynamic behavior
- External CSS: Upload custom CSS files to match your organization's branding
- Version Control: Use the Version field to track form changes over time
- Active/Expiration Dates: Set appropriate dates to control form availability
- QuestionInfo Logic: Use the QuestionInfo table to create conditional questions and branching logic
- Define TotalCalls, Screened, PreQualified, Referred categories
- Use "In" operator with CompareValue to specify allowed values
- Create cascading conditions for complex workflows
- Section JSON: Leverage Section JSON for advanced configuration when standard fields aren't sufficient
- Question Ordering: Use Save Order button after rearranging questions to preserve sequence
- Magic Numbers: Use Magic Numbers for form-specific identifiers and tracking codes
- Profile Target Email: Configure target emails to route form submissions appropriately
- Response Groups: Create reusable response groups for consistent answer options across forms
- Use standard groups like YesNo, Gender, YesDontKnow for common questions
- Create custom groups for medical conditions, study-specific options
- Response groups support pagination for large option lists (925 total groups available)
- Active/Expiration Dates: Set appropriate dates to control form availability
- QuestionInfo Logic: Use the QuestionInfo table to create conditional questions and branching logic
- Section JSON: Leverage Section JSON for advanced configuration when standard fields aren't sufficient
- Question Ordering: Use Save Order button after rearranging questions to preserve sequence
- Magic Numbers: Use Magic Numbers for form-specific identifiers and tracking codes
- Profile Target Email: Configure target emails to route form submissions appropriately
Next Steps
- Create a test form to familiarize yourself with the Forms tab fields
- Add sections to organize your form into logical groups
- Build questions using various question types (text, radiolist, textarea, hidden)
- Add hidden fields for tracking: FormReferenceID, ProjectID, StudyID, Origination, Result, CallerID, xferphone, call_duration, ProjNbr
- Configure QuestionInfo rules for conditional logic and branching
- Set up TotalCalls, Screened, PreQualified, and Referred categories
- Define cascading conditions with CompareValue lists
- Create and manage Response Groups for radiolist questions
- Browse existing groups (925 available) using pagination
- Create custom groups for study-specific answer options
- Assign response groups to radiolist questions
- Test form behavior with custom JavaScript validation
- Upload external CSS to style forms according to your branding
- Set Active and Expiration dates to control form availability
- Review the Questions table to verify question ordering and types
- Configure stored procedures for custom data processing when needed
- Use the filter dropdowns in Response Groups to find specific answer groups quickly
Navigation
← Previous: Vendors, Sponsors & CROs
📚 Documentation HomeNext: Custom Screener →
Generated from MCT Knowledge Base • v1.1.0 • January 2, 2026