
Timesheet Overview
Timesheet Overview
Category: Getting Started | Audience: undefined | Page: 4 of 33
Table of Contents
- Access the Time and Expense Tracker
- Submit a Timesheet (My Timesheet Tab)
- Impersonate Users (Admin Function)
- Manage Users (Admin Function)
Timesheet Overview
The Time and Expense Tracker is a comprehensive timesheet management system for Clinical Consulting Services, LLC. It provides time tracking, expense management, approval workflows, reporting, and administrative functions for managing employee time and project billing.
Key Concepts
- Time and Expense Tracker: Centralized system for tracking employee time, expenses, and vendor bills
- Timesheet Entry: Record time spent on projects with date, start/end times, client, project, category/role, and line items
- Approval Workflows: Multi-level approval system for timesheets, expenses, and vendor bills (employee submission → PM approval → final approval)
- Impersonate: Administrative feature to view and manage timesheets on behalf of other users
- Vendor Bills: Track and approve vendor invoices and bills
- Expense Tracker: Manage employee expense reports and reimbursements
- Reports: Generate timesheet reports filtered by date range, staff, and grouping options
- Admin Functions: User management, client/project setup, estimated hours, payroll cycle, departments, audit tables, look-ups, and expense approval
- Permissions: Role-based access control with area-based permissions for different projects
What You Can Do
- Submit and manage personal timesheets with detailed time entries
- Track time by client, project, category/role, and line items
- View timesheet history and total hours
- Submit and track expense reports
- View and approve timesheets for team members (managers/PMs)
- Approve vendor bills and expenses
- Impersonate users to manage their timesheets (admin function)
- Generate timesheet reports with flexible filtering and grouping
- Manage users, roles, and permissions (admin function)
- Configure clients, projects, estimated hours, and organizational settings
- Track payroll cycles and department assignments
- Audit timesheet and expense data
- Configure look-up values and approve/reject expenses
How To
Access the Time and Expense Tracker
- Navigate to https://timesheet.cssienroll.com
- Log in with your credentials
- The application header displays:
- Time and Expense Tracker logo for Clinical Consulting Services, LLC (top left)
- Change Password and Log Out links (top right corner)
- Welcome [Your Name] message (e.g., "Welcome Raghu") below the action links
- The main navigation bar provides access to all modules with 10 primary tabs
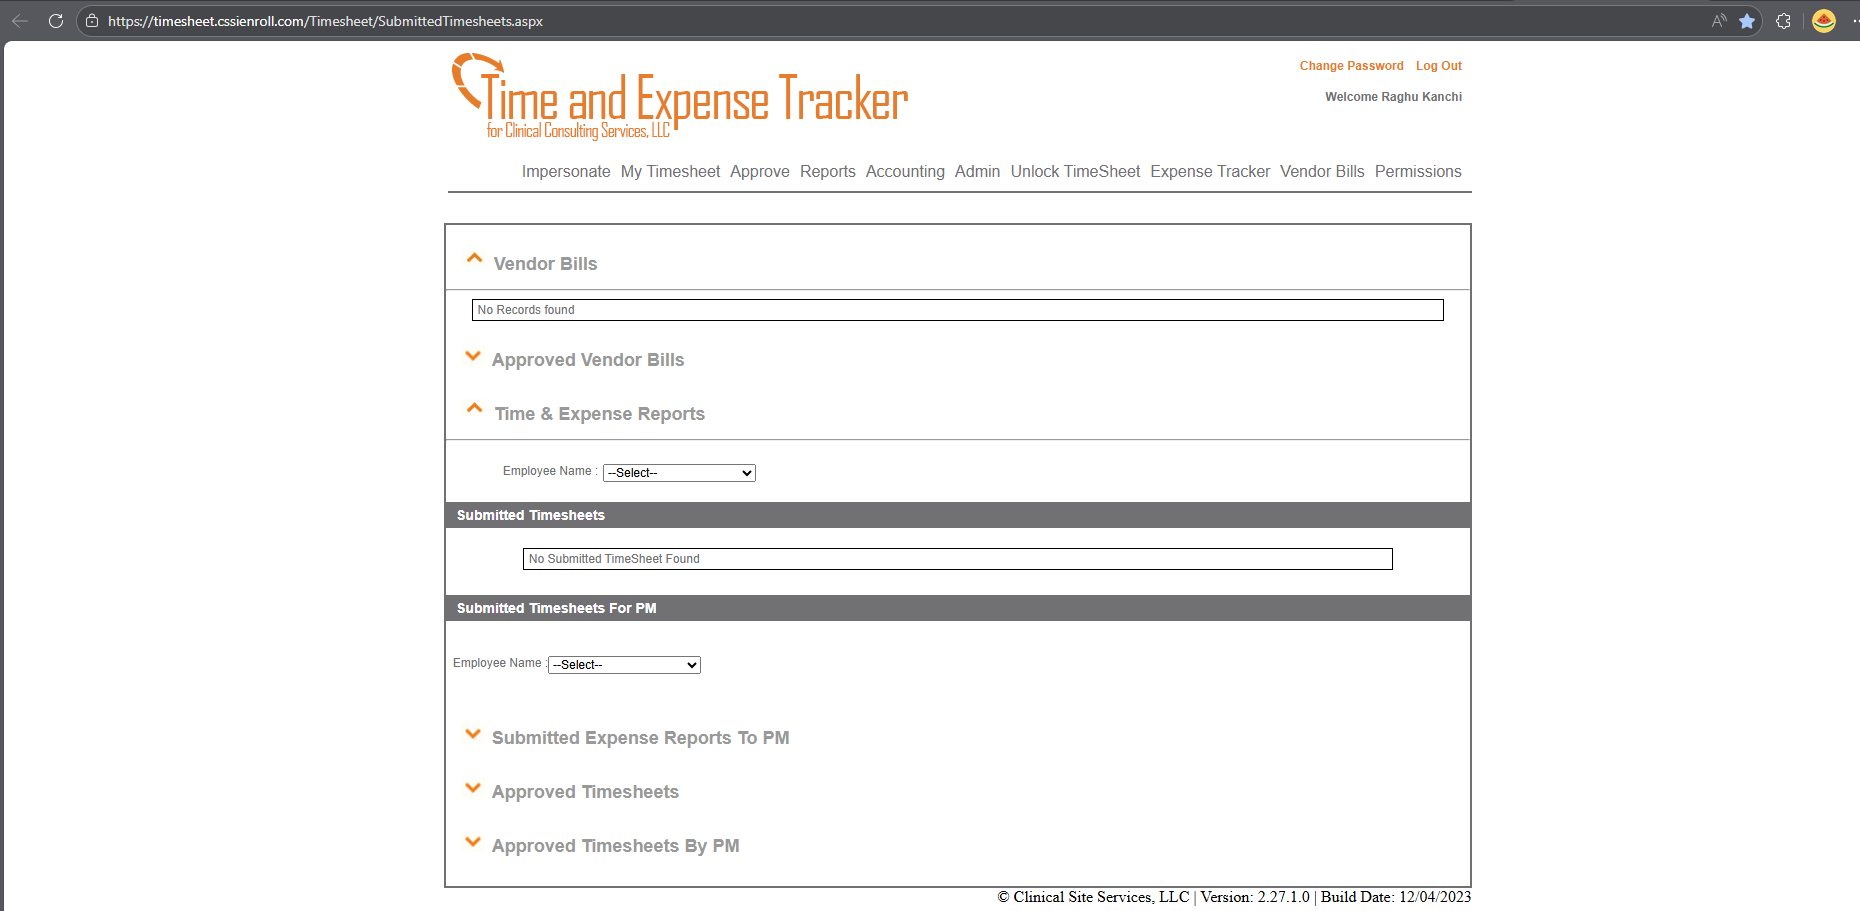
Main Navigation Tabs
Main Navigation Tabs
The Time and Expense Tracker provides the following main tabs in the navigation bar:
- Impersonate: View and manage timesheets for other users (admin function)
- My Timesheet: Submit and manage your personal timesheets
- Approve: Approve timesheets and expenses for your team
- Reports: Generate and view timesheet reports
- Accounting: Financial and accounting functions
- Admin: System administration and configuration
- Unlock TimeSheet: Unlock timesheets for editing (admin function)
- Expense Tracker: Submit and manage expense reports
- Vendor Bills: Track and approve vendor invoices
- Permissions: Manage user permissions and access control
Dashboard Overview
The dashboard provides quick access to key timesheet functions:
Vendor Bills Section:- Displays pending vendor bills requiring review
- Shows "No Records found" when no bills are pending
- List of vendor bills that have been approved
- Employee Name dropdown: Filter reports by employee
- View submitted and approved time and expense reports
- Displays timesheets submitted for approval
- Shows "No Submitted TimeSheet Found" when queue is empty
- Project Manager view of timesheets awaiting approval
- Employee Name dropdown: Filter by employee
- PM-specific approval queue
- Expense reports submitted to Project Managers for approval
- List of timesheets that have been approved
- List of timesheets approved by Project Managers
Submit a Timesheet (My Timesheet Tab)
- Click on the My Timesheet tab in the main navigation
- Click "Add TimeSheet" or navigate to the timesheet entry page
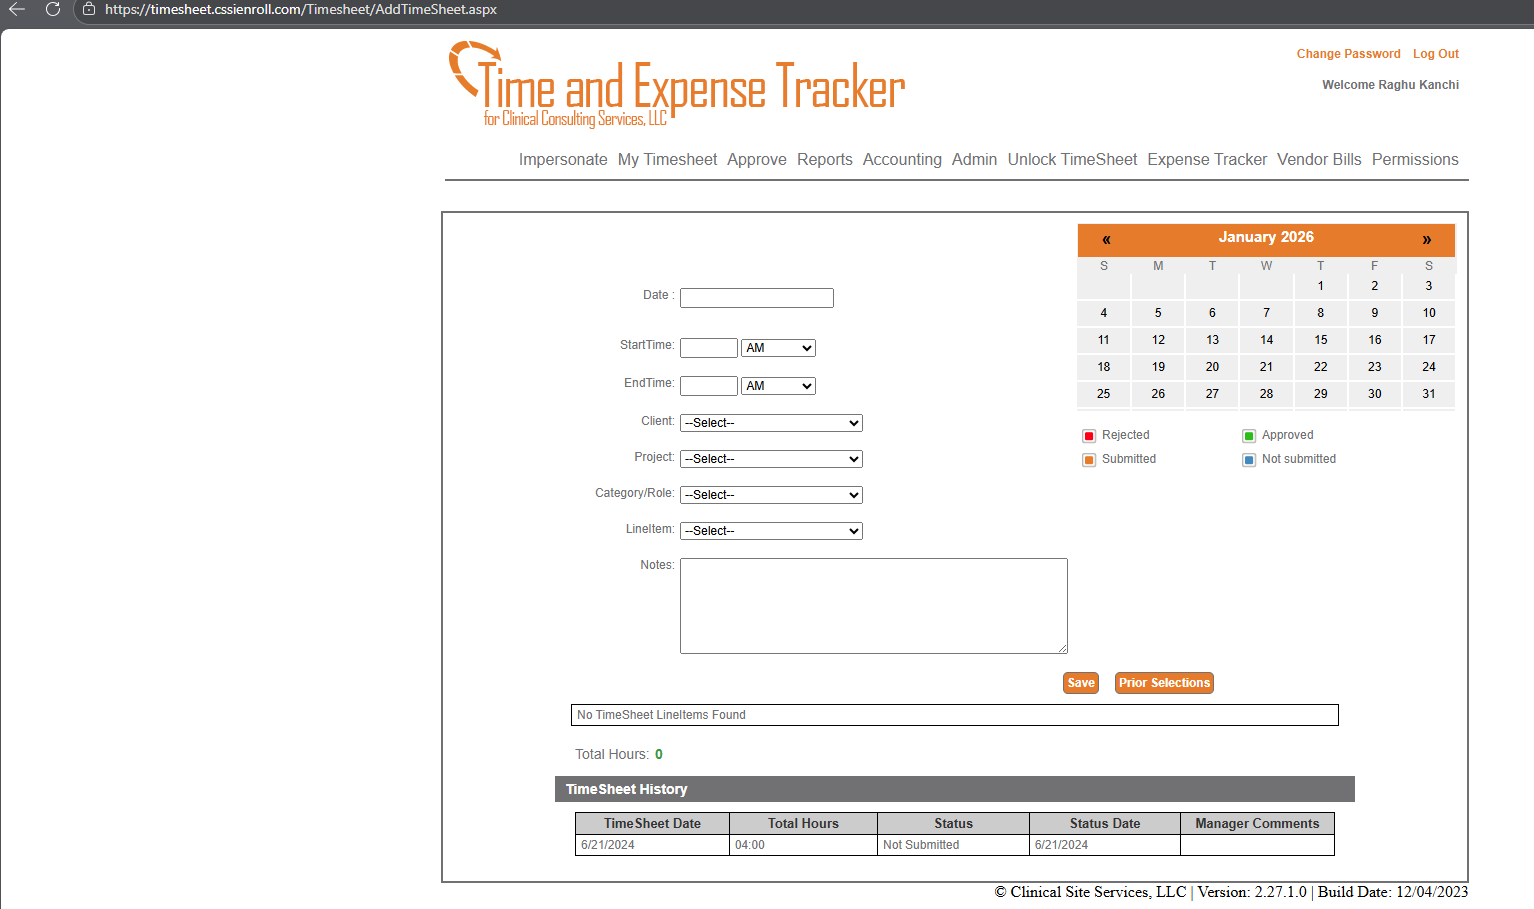 Timesheet Entry Interface:
The timesheet entry page includes:
Calendar View:- Monthly calendar (e.g., "January 2026") with navigation arrows
- Color-coded dates:
- 🟥 Red: Rejected timesheets
- 🟩 Green: Approved timesheets
- 🟧 Orange: Submitted (pending approval)
- ⬜ White: Not submitted
Timesheet Entry Fields:- Date: Enter the date in text field (mm/dd/yyyy format)
- Can also click on calendar date to auto-populate
- StartTime: Enter start time
- Time input field
- AM/PM dropdown selector
- EndTime: Enter end time
- Time input field
- AM/PM dropdown selector
- System calculates duration automatically
- Client: Select client from --Select-- dropdown
- Lists all available clients
- Project: Select project from --Select-- dropdown
- Lists projects associated with selected client
- Required field
- Category/Role: Select category from --Select-- dropdown
- Defines the type of work or role
- Examples: Development, Management, Consulting, etc.
- LineItem: Select line item from --Select-- dropdown
- Specific task or deliverable within the project
- Lists available line items for the selected project
- Notes: Enter detailed notes in text area
- Describe the work performed
- Optional but recommended for clarity
Action Buttons:- Save: Click to save the timesheet entry
- Prior Selections: Load previous entry details for quick re-entry
- Displays "No TimeSheet LineItems Found" when no entries exist
- Once entries are added, they appear in a list below
- Shows cumulative hours: "Total Hours: 0" (updates as entries are added)
Below the entry form is a history table showing previous timesheets:
TimeSheet History Table Columns:- TimeSheet Date: Date of the timesheet entry (e.g., "8/21/2024")
- Total Hours: Hours logged (e.g., "04.00")
- Status: Current status ("Not Submitted", "Submitted", "Approved", "Rejected")
- Status Date: Date of last status change (e.g., "8/21/2024")
- Manager Comments: Comments from approving manager (if any)
- Employee enters time using the form above
- Clicks Save to add entries
- Submits timesheet for approval (changes status to "Submitted")
- Manager/PM reviews and approves or rejects
- Approved timesheets show in green on calendar
- Rejected timesheets can be edited and resubmitted
Impersonate Users (Admin Function)
- Click on the Impersonate tab in the main navigation
- The Impersonate page displays a list of all users
The Impersonate page provides a comprehensive user list with sub-tabs:
Sub-Tabs:- Users: Main user list (default view)
- Clients: View and manage clients
- Projects: View and manage projects
- Estimated hours: View estimated hours for projects
- PayRoll Cycle: Manage payroll cycles
- Department and Tasks: Manage departments and task assignments
- Audit Tables: View audit logs
- Look Ups: Manage lookup values
- Approve/Reject Expenses: Approve or reject expense reports
The main user table displays:
Column Headings:- Select User: Link to impersonate each user
- First Name: Employee first name (e.g., "host", "Amy", "Susan", "Gemma")
- Last Name: Employee last name (e.g., "User", "Davis", "Reiner", "Groppi")
- Email: Employee email address (e.g., "[email protected]", "[email protected]")
- Filter icon (▼) in each column header for filtering
- Sortable columns (click header to sort)
- Pagination at bottom showing page numbers (1, 2, 3) and navigation arrows
- Page size dropdown: "20" (number of results per page)
- host User - [email protected]
- Abc - [email protected]
- Susai - susai@[email protected]
- Find the user in the list using filters or pagination
- Click Select User link next to the employee's name
- You'll be switched to that user's timesheet view
- You can now submit, edit, or manage timesheets on their behalf
- Useful for managers helping employees or correcting timesheet issues
Generate Timesheet Reports
- Click on the Reports tab in the main navigation
- The Reports page opens with filtering options
- TimeSheet Report: Generate timesheet reports (default)
- More Reports: Additional report options
The report generator provides flexible filtering options:
Report Filter Fields:- From Date: Enter start date for report range
- Text input field (mm/dd/yyyy format)
- To Date: Enter end date for report range
- Text input field (mm/dd/yyyy format)
- Leave blank to include all dates after From Date
- Staff: Select employee from dropdown
- Example: "Jhon"
- Filter report by specific staff member
- First Group results by: Select primary grouping from dropdown
- Options: Date, Project, Client, Category, etc.
- Default: "Date"
- Determines how report data is organized
- then group by: Select secondary grouping from dropdown
- Options: None, Date, Project, Client, Category, etc.
- Default: "None"
- Optional sub-grouping within primary groups
- then group by: Select tertiary grouping from dropdown
- Options: None, Date, Project, Client, Category, etc.
- Default: "None"
- Optional additional sub-grouping
- Details: Select detail level from dropdown
- Options: Show Notes, Hide Notes, etc.
- Default: "Show Notes"
- Controls how much detail appears in report
Action Button:- View Report: Click to generate the report
- Report displays below based on selected filters
- Can be exported to Excel or PDF
Report Features:- Flexible multi-level grouping for customized report views
- Date range filtering for specific time periods
- Staff-specific reports for individual employee tracking
- Detail control to show or hide notes
- Export capabilities for further analysis
- Weekly staff reports: Select staff, set date range, group by Date
- Project summary: Group by Project, then by Date
- Client billing: Group by Client, then by Project
- Category analysis: Group by Category/Role, then by Project
Manage Users (Admin Function)
- Click on the Admin tab in the main navigation
- Select Users from the sub-navigation or admin menu
- The Users management page opens
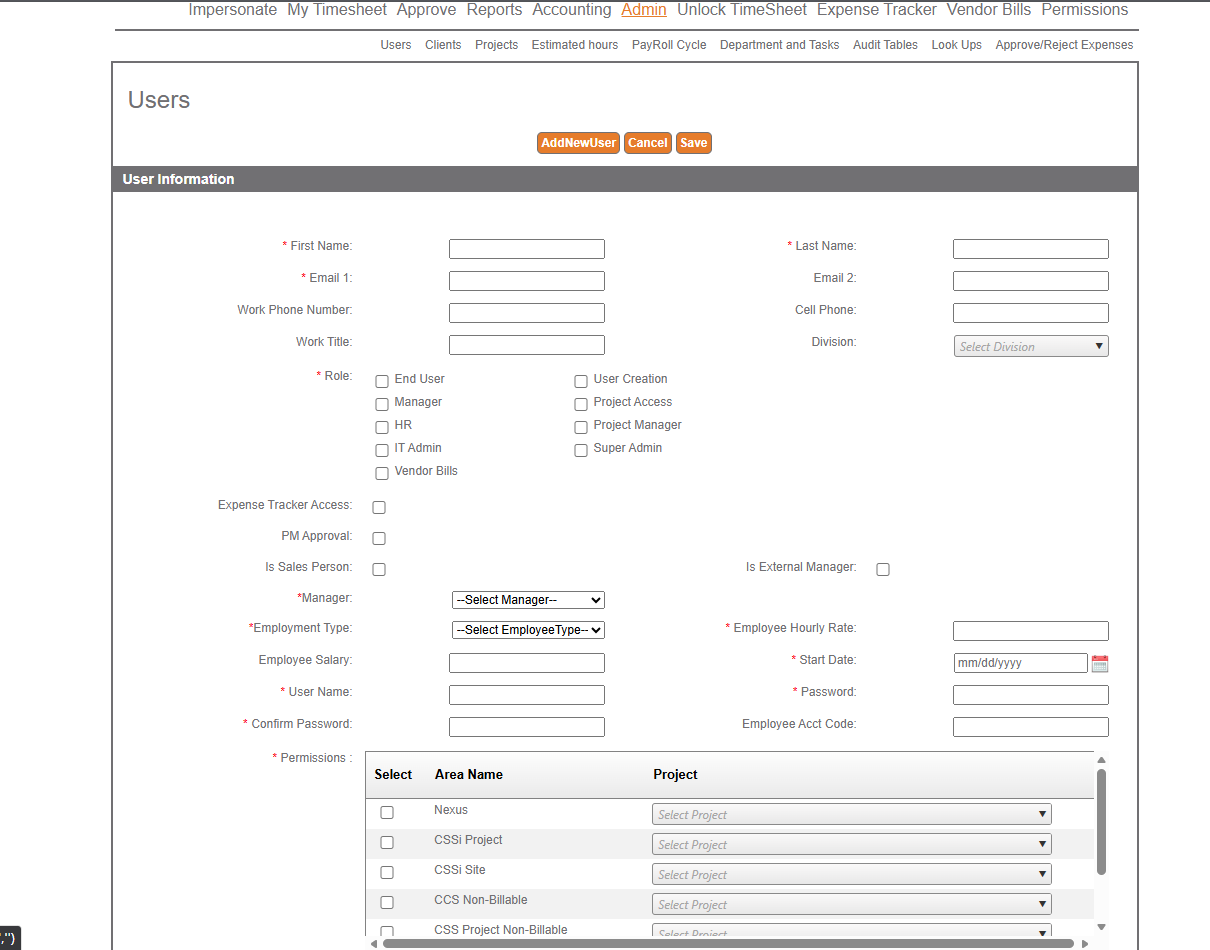 Users Management Interface:
Admin Sub-Tabs:
Users Management Interface:
Admin Sub-Tabs:
- Users: User management (current view)
- Clients: Manage clients
- Projects: Manage projects
- Estimated hours: Set estimated hours for projects
- PayRoll Cycle: Manage payroll cycles
- Department and Tasks: Manage departments and task assignments
- Audit Tables: View audit logs
- Look Ups: Manage lookup values
- Approve/Reject Expenses: Expense approval workflow
- AddNewUser: Create a new user account
- Cancel: Cancel current operation
- Save: Save user information
Create or edit user accounts with the following fields:
Personal Information:- First Name: Enter employee first name (required field marked with )
- Last Name: Enter employee last name (required field marked with )
- Email 1: Enter primary email address (required field marked with )
- Email 2: Enter secondary email address (optional)
- Work Phone Number: Enter work phone
- Cell Phone: Enter mobile phone
- Work Title: Enter job title
- Division: Select division from Select Division dropdown
- Role (required field marked with ): Select user roles by checking boxes:
- ☐ End User: Basic timesheet entry access
- ☐ Manager: Team management and approval rights
- ☐ HR: Human resources access
- ☐ IT Admin: IT administrative functions
- ☐ Vendor Bills: Vendor bill management
- ☐ User Creation: Ability to create new users
- ☐ Project Access: Access to project management
- ☐ Project Manager: Project manager role
- ☐ Super Admin: Full system administrative access
Additional Permissions:- Expense Tracker Access: ☐ Grant access to expense tracking module
- PM Approval: ☐ Grant PM-level approval rights
- Is Sales Person: ☐ Designate as sales personnel
- Is External Manager: ☐ Designate as external manager
- Manager: Select manager from --Select Manager-- dropdown
- Assigns reporting structure
- Employment Type (required field marked with ): Select from dropdown
- Options: --Select Employee type--, Full-Time, Part-Time, Contract, etc.
- Employee Salary: Enter annual salary (optional)
- Employee Hourly Rate (required field marked with ): Enter hourly rate
- Start Date (required field marked with ): Enter start date in mm/dd/yyyy format
- Calendar icon opens date picker
Account Credentials:- User Name (required field marked with ): Enter username for login
- Password (required field marked with ): Enter password
- Confirm Password (required field marked with ): Re-enter password for confirmation
- Employee Acct Code: Enter employee account code (optional)
- Permissions (required field marked with ): Assign project/area permissions
The Permissions section includes a table with columns:
- Select: Checkbox to enable access
- Area Name: Project or department name (e.g., "Nexus", "CSSI Project", "CSSI Site", "CCS Non-Billable", "CSS Project Non-Billable")
- Project: Select specific project from Select Project dropdown
- ☐ Nexus - [Select Project dropdown]
- ☐ CSSI Project - [Select Project dropdown]
- ☐ CSSI Site - [Select Project dropdown]
- ☐ CCS Non-Billable - [Select Project dropdown]
- ☐ CSS Project Non-Billable - [Select Project dropdown]
- Fill in all required fields (marked with )
- Select appropriate roles and permissions
- Assign project access in Permissions section
- Click Save button to create/update user
- Click Cancel to discard changes
View User List
Scroll down on the Admin > Users page to see the User List section:
User List Section: Search and Filter:- User: Select search field from FirstName dropdown
- Options: FirstName, LastName, Email, UserName, etc.
- Enter search term in text field
- Click Search button to filter results
The table displays all system users with the following columns:
Table Columns:- Delete: Orange "Delete" link to remove user
- Edit: Orange "Edit" link to modify user details
- UserName: Login username (e.g., "host", "ctizena", "kluffhcke")
- Name: Full name (e.g., "host User", "Chris", "Kathy")
- Email: Email address (e.g., "[email protected]", "[email protected]")
- Employee Type: Employment classification (e.g., "FullTime", "Contract")
- Manager: Assigned manager name (e.g., "Paula", "Chris Tizena")
- Department: Department or project assignments
- Shows multiple lines for users with multiple project assignments
- Examples: "Nexus, CSSI Project, CSSI Site, CCS Non-Billable, FMS Project Non-Billable, CSSi LifeSciences, CCS - Corp"
- Inactive Date: Date when user was deactivated (if applicable)
- Examples: "5/9/2025", "9/23/2014", "9/12/2024", "9/26/2024"
- Empty for active users
User List Examples:- host - host User - [email protected] - FullTime - Paula Walker
- Departments: Nexus, CSSI Project, CSSI Site, CCS Non-Billable, FMS Project Non-Billable, CSSi LifeSciences, CCS - Corp
- ctizena - Chris Tizena - [email protected] - FullTime - Paula Walker
- Departments: Nexus, CSSI Project, CCS Non-Billable, CSSI Site, FMS Project Non-Billable, CSSi LifeSciences
- Inactive Date: 5/9/2025
- kluffhcke - Kathy- [email protected] - FullTime - Chris Tizena
- Departments: Nexus, CSSI Site, CSSI Site, CCS Non-Billable, CSS Project Non-Billable, FMS, CSSi LifeSciences
- Inactive Date: 9/23/2014
User List Features:- Quick edit/delete links for each user
- Search and filter by multiple criteria
- Shows complete department/project assignments
- Displays inactive users with deactivation dates
- Manager and employment type clearly visible
Tips & Best Practices
- Consistency: Log your time daily to maintain accurate records.
- Detailed Notes: Add detailed notes to each entry for better context.
- Regular Reviews: Periodically review your time logs to ensure they align with project goals.
Next Steps
Now that you have an overview of the Timesheet feature, start by recording your time for ongoing projects. Explore the dashboard to get insights into your time management and make adjustments as needed. For more detailed instructions, refer to the Timesheet User Guide available in the Help Center.
Navigation
← Previous: MTJ Overview
📚 Documentation HomeNext: User Roles & Permissions →
Generated from MCT Knowledge Base • v1.1.0 • January 2, 2026